Monday, February 1, 2010

Culinary Aspirations

I subscribe to many, many food blogs. Twenty-three, to be exact. This leads to a LOT of bookmarked recipes, all of which I swear I'll make one day. Here's a round-up of some of my recent favorites (that I've still yet to try):

Easy Sausage and Peppers from The Kitchn


Hot Caramelized Onion Dip from Closet Cooking
 

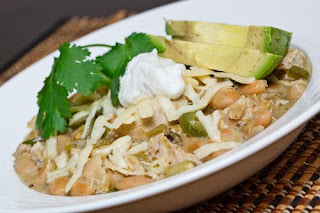
White Chicken Chili from Closet Cooking
 

Pear and Gorgonazola Omelette from Closet Cooking


Beer-Braised Beef and Onions from Gourmet Magazine, via Epicurious
 

Pretty much Marlboro Man's entire Birthday Dinner from Pioneer Woman

Sunday, January 31, 2010

Cheese

I got a wonderful Christmas present from Mama Fink (C's mom). It's beautiful. Glorious even.


A six-sided box grater. Just like Alton Brown has! It''s magnificent. I will never go back to regular plane graters again. This one has four grades of graters, from fine to extra large (which I bet would be great for hashbrowns),  plus two grades of zesters.

My first use of my new grater was to shred eight ounces of cheddar to make a Saturday afternoon snack of Welsh Rarebit.


It was all I could do to stop myself from sticking a fork in and eating it straight.

Here it is piled high in the pot:


As you can see, this is clearly enough cheese sauce to feed an army. I only needed about a quarter of a cup to go over my toast. Luckily, the sauce is easily refrigerated, and goes well with biscuits on Sunday morning.

Tuesday, January 26, 2010

Banana 'Ice Cream'

This is so simple, yet so tasty, and you won't believe it until you try it.


Ingredient
Bananas

(yep, that's it!)

Directions
Slice up a banana or two, then freeze it.


I've found it's easier to slice then freeze, since cutting a frozen banana isn't easy. It'll take a few hours for your slices to freeze. I usually let mine go overnight.


Whip out your trusty Magic Bullet or blender.


Toss in your bananas and blend.


You can dribble in a tiny bit of milk or vanilla or cream if you want, but your bananas, after a minute or so, will come out looking like this:


Unless, of course, your Magic Bullet dies. Which mine finally did, right in the middle of banana-ice-cream-making magic. The above picture is a screen shot from months ago when I first tried this recipe.

So what's a girl with a broken Magic Bullet and no blender and a serious craving for banana ice cream supposed to do?

She gets creative. And out comes the hand mixer. And guess what? It worked!


A blender is still ideal, to get the ultimate creaminess. Seriously, it gets to the exact texture of soft-serve ice cream.


You can even store it in the freezer, then later serve it to your guests at a dinner party and make them guess the ingredients. Or ingredient.

Or you can add some mini chocolate chips and gobble the whole thing. What? It's just bananas! It's good for you!


Wednesday, January 6, 2010

Homemade Vanilla Extract

Now that Christmas has come and gone (and then some), I can finally reveal a little project I've been working on: homemade vanilla extract. Back in November, I was searching for easy, homemade gifts to give at Christmas. Cookie mix, limoncello, granola ... vanilla seemed the easiest, the cheapest, and the prettiest.

Ingredients/Supplies
Vanilla Beans
Vodka
Containers

The ratio is 2-3 beans per 6-8 ounces vodka.

I found my beans at Beanilla.com. I ordered the variety pack, and received a bunch of different kinds - Indonesian, Mexican, Indian, etc. Cost: $25.


For the containers, I hit up an old favorite: American Science & Surplus! Cost: $15.


As for the liquor, I wanted something not too expensive but not tasting of gasoline - Skyy Vodka. Cost: $20. I read that you can substitute other liquors as well. I bet rum and bourbon would both work.


Directions
Places two beans in each container, and fill with vodka. Seal and let sit in a cool place for 8 weeks.

That's it!


I made 12 bottles to give away. They make good gifts for moms, aunts, and hostesses. Plus one for me.


(This picture is on day one. You want them to darken up a bit before using.)

Total cost: $60 / 12 bottles =  only $5 each!

I even went one step further and made labels. I went for an old-timey "Dr. Fantastik's Amazing Liquer" look.


I got a lot of compliments on this idea,  but don't know if anyone has used theirs yet (including me). At least they look good!

Sunday, December 20, 2009

Tyler Durden Chicken

This recipe is from All Bower Power. It's called Tyler Durden Chicken because in their version, they make it super spicy. My version is less spicy, and kind of changes every time I make it.

Let's start off with this:


Normally, I would never be suckered into a product packaged in individualized portions. Why not just buy generic store-brand chicken breasts, then wrap them in plastic wrap myself? But this was on sale, you guys! And it was calling out to me and me single-mouth household. This is a serious issue around here, because when you are only feeding one person, you have to go through ingredients before they spoil. So while something could serve a family of four or five for one meal, at my house it means having the same thing for lunch and dinner every day for a week. With this 'perfect portions' chicken, I can pull out just one serving to defrost at a time, and the rest can stay frozen for weeks. Also it was on sale. Did I mention that already?

Back to Tyler Durden Chicken:

Ingredients
Chicken
Butter
Seasoning
Garlic (real or powdered)
Cayenne/Red Pepper/Chili Powder/What have you
Orange Juice


Directions
1. Toss some butter in a pan and get it going. Meanwhile, chop up your chicken into bite size pieces.
2. Add your chicken to the pan. I like to add my seasonings at this juncture - salt, pepper, chicken seasoning, garlic powder, cayenne, or whatever you like.
3. After the chicken cooks for a minute or so, pour in the OJ. I pour about 2/3rds of the way up the chicken.


4. Cook that sucker on medium high. Stir it occasionally.
5. Let the orange juice cook down until it's nice and goopey. This may take awhile. If you are impatient, start with orange juice concentrate instead of regular orange juice. I've found a good balance is partially watered-down concentrate, but either way will work. You're good to go when it looks like this:


You can serve it with rice, or a salad, or you can be lazy like me and eat it alone. Enjoy!


Monday, December 14, 2009

Candy Cane Cookies

It's that time of year - time for Christmas cookies.

My family doesn't really have any family recipes, but this is one of the few. My mom made these cookies with her family when she was a kid, and then made them with my brothers and me when we were kids. And here's where the cookies become infamous: one year, my youngest brother Jeff got a bit overzealous with the raw cookie dough. Let's just say the now, years later, he still gets a bit green around the gills when he smells almond extract. I still love them, though. They're easy to make, pretty to look at, and mildly sweet. Why we use almond extract and not peppermint I don't know, but trust me, they taste delicious.


Ingredients

1 c. shortening
1 c. sifted confectioner's sugar
1 egg
1 ½  tsp almond extract
1 tsp vanilla
2 ½ cups flour
1 tsp salt
Red food coloring


Directions

1. Mix together your wet ingredients - shortening, egg, vanilla, almond, and sugar. I recommend an extra-large egg, because the dough can be a bit dry. 
2.  Sift in the flour and salt.

If your dough is a little crumbly, you can mix in a smidge of water. You want your dough to have the consistency of playdough. I added water because mine came out like this:


3. Once your dough is mixed, remove half and place in plastic wrap in the fridge (make a giant dough ball). Take your remaining half and add red food dye until you get a nice pink color. Put this in plastic in the fridge as well.

4. Clean up the red food dye you invariably got all over your hands, counter, and the cat.
5. After at least one hour or overnight, break out your dough balls (heh).
6. Roll out some 'worms' the thickness of your pinky.


7. Twist them together, the roll a bit to get them joined.


Then place on a cookie sheet and shape like a candy cane.


7a. Alternate method - the marble. Roll two pieces of dough into a ball, then roll into your worm shape.


8. Repeat. Repeat. Repeat.


9. Bake at 375 degrees for 9-12 minutes. These cookies don't really puff, so you can place them fairly close to each other on your cookie sheet. They also don't brown too much, and will come out looking pretty much how they looked when you put them in.

Yields about 4 dozen. Last approx. 4 hours until they're hoovered.


Wednesday, December 2, 2009

Easy As Chicken Pie

Here's a great throw-it-together recipe that I came up with. I even entered it into a recipe contest. A few of the commenters there despaired that it was 'not cooking' and that 'you might as well just buy a frozen chicken pot pie from the supermarket and call it a day.' But then others chimed in that they appreciated the easiness of the recipe, and while it may not be health food, it's damned delicious!


Ingredients
1 deli rotisserie chicken
1 can condensed chicken soup
1 can condensed potato soup
1 bag frozen vegetables (optional)
1 can refrigerated biscuits or puff pastry or pie shell


Directions
1. Shred the chicken from the deli and place into pie pan. Save the carcass for stock and make chicken stock!
2. Combine both cans of soup with one cup of milk or water, then pour over chicken. If you want to add thawed frozen vegetables, go for it.
3. Place biscuit dough/puff pastry on top of the pie mixture.
4. Bake until the biscuits/puff pastry are ready (about 20 minutes at 375 degrees)
5. Eat!